eMedley
Student Help
- Access eMedley using OLSEN
- Change default application to educate and change calendar views
- Access calendar from educate
- View upcoming assignments in educate
- View announcements in educate
- View the calendar in ecurriculum
- Understand the ecurriculum event page
- Access the internal messaging system in educate
- Create bookmark or shortcut to eMedley login page
- Add ecurriculum calendar events to your personal calendar
- Go to uthsc.edu. Under Academics, select Medicine. Then under Current Students, select OLSEN.
- On OLSEN page, click on eMedley link, input netID and password to enter system.
- To change your default calendar settings, click on your name in the top right corner. Select My Account > Settings.
- While in settings, change the default application to educate.
- Access the calendar page by clicking the link above the mini calendar on the right.
- Assignments are published in announcements and are be accessible under the “Upcoming Assignments” tab. This is where you submit documents (such as Preceptor Logs).
- Once published, grades will be viewable under the “Grades” tab.
- Access the course announcements feed from the educate tab.
- Click on the "+" next to an announcement or double-click the subject to view its associated information/documents.
- The associated course and session will be shown directly above the document(s). Clicking on the link will display a page with descriptions, documents, and announcements.
- If a document is posted, hover your cursor over the document icon to view the name of it. Double-click to open.
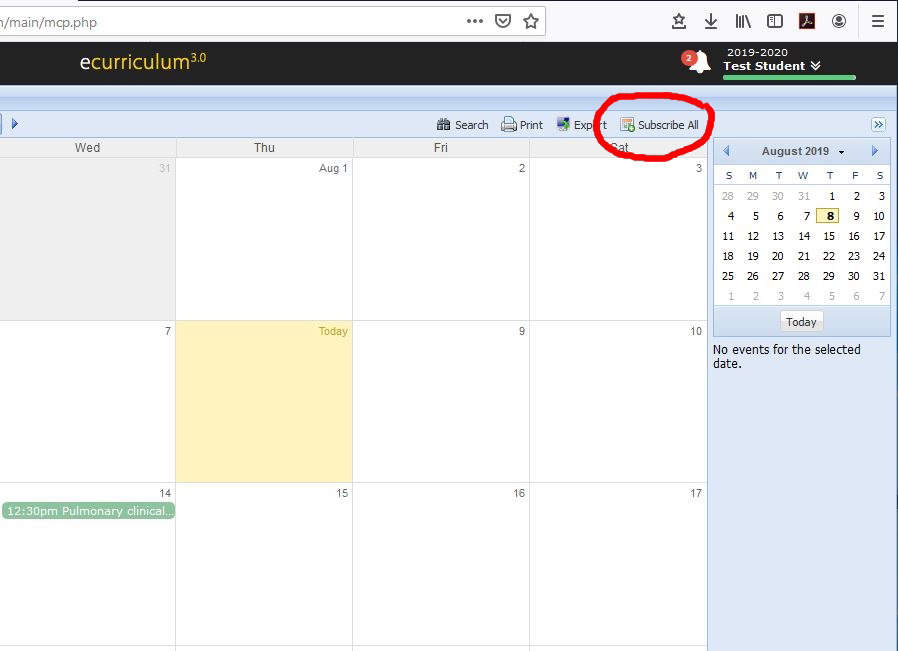
- Access the calendar page by navigating to ecurriculum.
- While on the calendar page, you can change the view settings to day, week, or month.
- Click on a specific date on the mini calendar on the right, and a drop-down list will display all the sessions and descriptions for that day.
- On the calendar, if there are too many events to be displayed, click on the “+ 3 more” to view all sessions for the day.
- Pay attention to the titles of the sessions. Mandatory events are marked by “REQ” at the beginning of each session name. (This is analogous to the “M” label that in CORE.)
- After selecting an Event from the ecurriculum calendar, the following event identifiers will be displayed: date, time, name, description, location, faculty
- Documents posted under “Documents” are currently available for all events. These documents will likely include pre-study and supplemental materials.
- Documents posted under “Announcement” can be found on the event page after the announcement has been published. These will likely include: in-class material, post-study material, and videos.
- A list of clickable links for all Courses can be found to the left of the page – clicking a Course link will take you to its Course Page.
- Similarly, a list of clickable links for all events can be found at the bottom of the course page – clicking an event link will take you to its event page.
- Duplicate events, such as SPEDs, will have a schedule posted – you are only required to attend the time slot to which you are assigned.
- Access the internal messaging system by clicking on the envelope link above the mini calendar on the right.
eMedley is best utilized on a desktop computer but will function decently on a mobile device as well. Recommended browsers include Chrome, Firefox and Safari. The videos below show how to create quicklinks to the eMedley login page. All of these start on the OLSEN page, which might another page to consider creating a quicklink to.
- Bookmark eMedley login page in Firefox
- Bookmark eMedley login page in Chrome
- Create shortcut to eMedley login page on iPhone
To see course events on a personal calendar, get the eMedley calendar subscription link from educate/ecurriculum. Please note that materials and instructions connected to the event will not be displayed - only the event name, date, time, and location. Viewing all the information associated with an event requires logging in to eMedley.
While inside eMedley, navigate to educate or ecurriculum and click on the calendar icon. Once the calendar displays, the Subscribe All button is in the upper right of the screen.
Click on it, and a unique calendar link is displayed. Copy it and save it somewhere to access later.
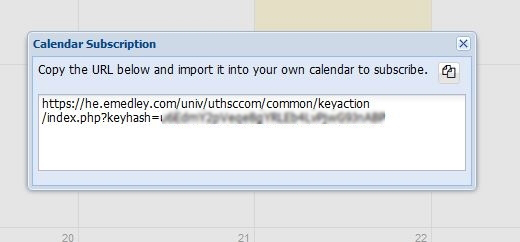
Use the link to add the eMedley calendar to a preferred calendar program. If an event changes, the changes should be reflected in the calendar but may not show immediately. Specific instructions for how to add calendars using a link can be accessed below.