Modern Campus CMS Basics
Terminology used when working with Modern Campus CMS
Overview
Our Content Management System (CMS) may be referred to by the following aliases:
- Content Management System (CMS)
- Omni CMS - The former name of the CMS we use
- Modern Campus - The company that makes Modern Campus CMS
Those terms are all referring to the same thing and can be used interchangeably when discussing the website.
Locations
- Staging - The place where users edit pages before publishing them.
- WebQA - The test website where sites can be published for review by the client. This site can be found at webqa.uthsc.edu and requires the user to be using the UTHSC internet. To view it on locations outside the UTHSC campus you must be logged onto the VPN. To use the VPN you can review instructions for downloading the VPN. Only level 10 administrators can publish to WebQA.
- Production - This refers to the live version of the website. This is the version of the site that the general public will be able to see.
Homepage, Index Page and Landing Page
These terms refer to the default page of a directory on the web. Think of it as the front door. On uthsc.edu these pages are always named index.php
Binary Files
Anything that is not a webpage (ending in .php) is considered a binary file. This includes:
- Images - .jpg, .jpeg, .gif, .png
- Documents - .doc, .docx, .pdf
- Spreadsheets - .xls, .xlsx
- Presentations - .ppt, .pptx
Publish Control File
An XML file type that allows for special editing capabilities within Modern Campus
CMS. This file type typically produces a standard web file, such as HTML, on publish.
A webpage's location within Modern Campus CMS will end in .pcf. A webpage's live URL will end in .php.
Short URLs
Short URLs are custom URLs that can be used for marketing materials to direct users to specific pages with long URLs.
For example, the Medical Laboratory Science program in the College of Health Professions uses the URL https://uthsc.edu/mls for their marketing materials. This redirects to the actual URL which is: https://uthsc.edu/health-professions/diagnostic-health-sciences/mls/index.php.
If you require a Short/Vanity URL please email the Digital Content Team at website@uthsc.edu.
Logging into Modern Campus CMS
Request Access
To request access to Modern Campus CMS, contact the UTHSC Digital Content Team at website@uthsc.edu. The Digital Content Team handles requests for access and provides training for users on Modern Campus CMS.
DirectEdit Link
The DirectEdit Link is the simplest way to log in to Modern Campus CMS and go directly to the page you need to edit. The DirectEdit Link is a “hidden” link on every published webpage that you can use to access the Modern Campus CMS interface.
If your login credentials have editing permissions for that page, and you have logged in successfully, you will be taken to the Editor View for the page. From there, you will be able to edit any editable regions and will also be able to navigate to other pages and information that you have access to within Modern Campus CMS.
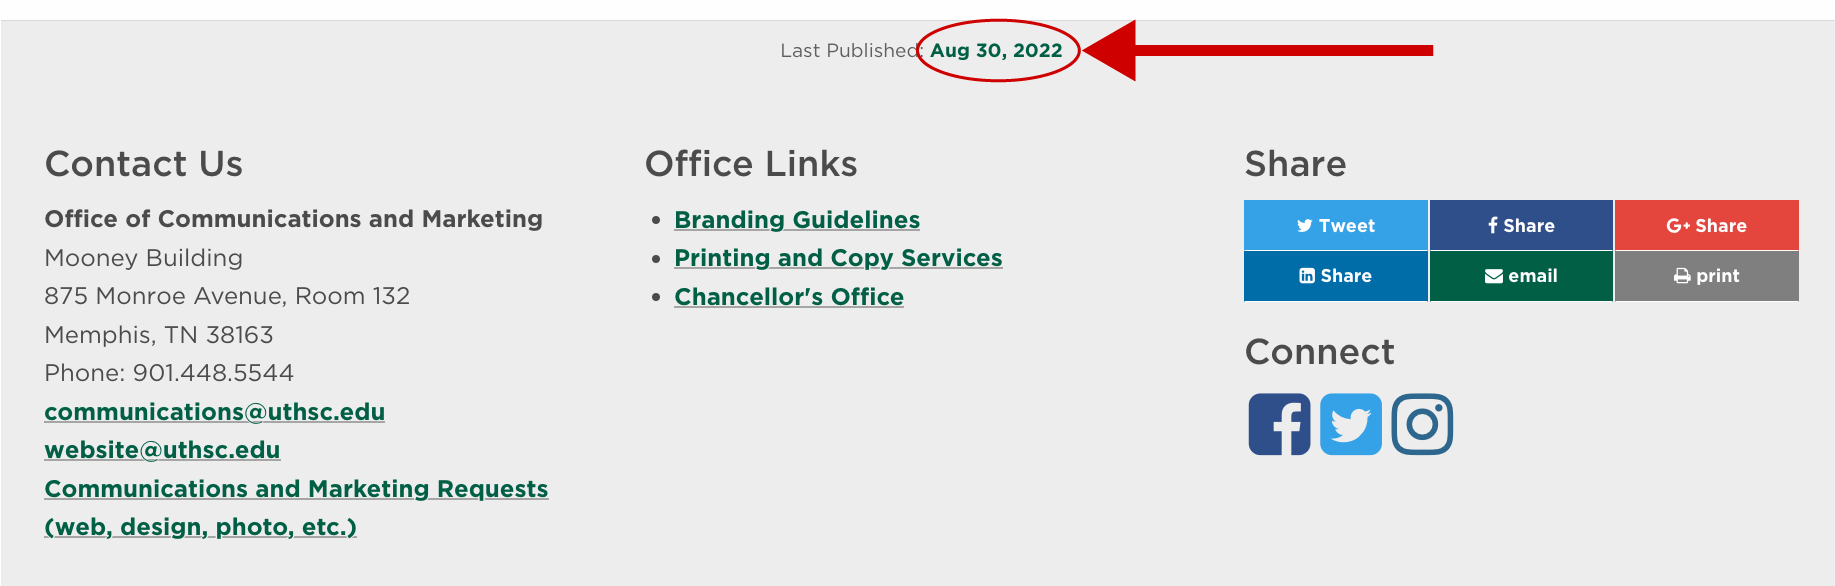
- Navigate to a published webpage that you have access to edit. For example, if you have access to a specific area within a College or Unit, go to your area’s homepage.
- Click on the link that is a date next to 'Last Published' above the section links
- You will be directed to the UTHSC CAS login window to login with your UTHSC NetID and password.
- Once you have logged in you will be redirected to the Modern Campus CMS Editor View for the page you logged in from.
Basics of the Modern Campus Interface
Once logged in, you will be presented with the Modern Campus CMS interface. 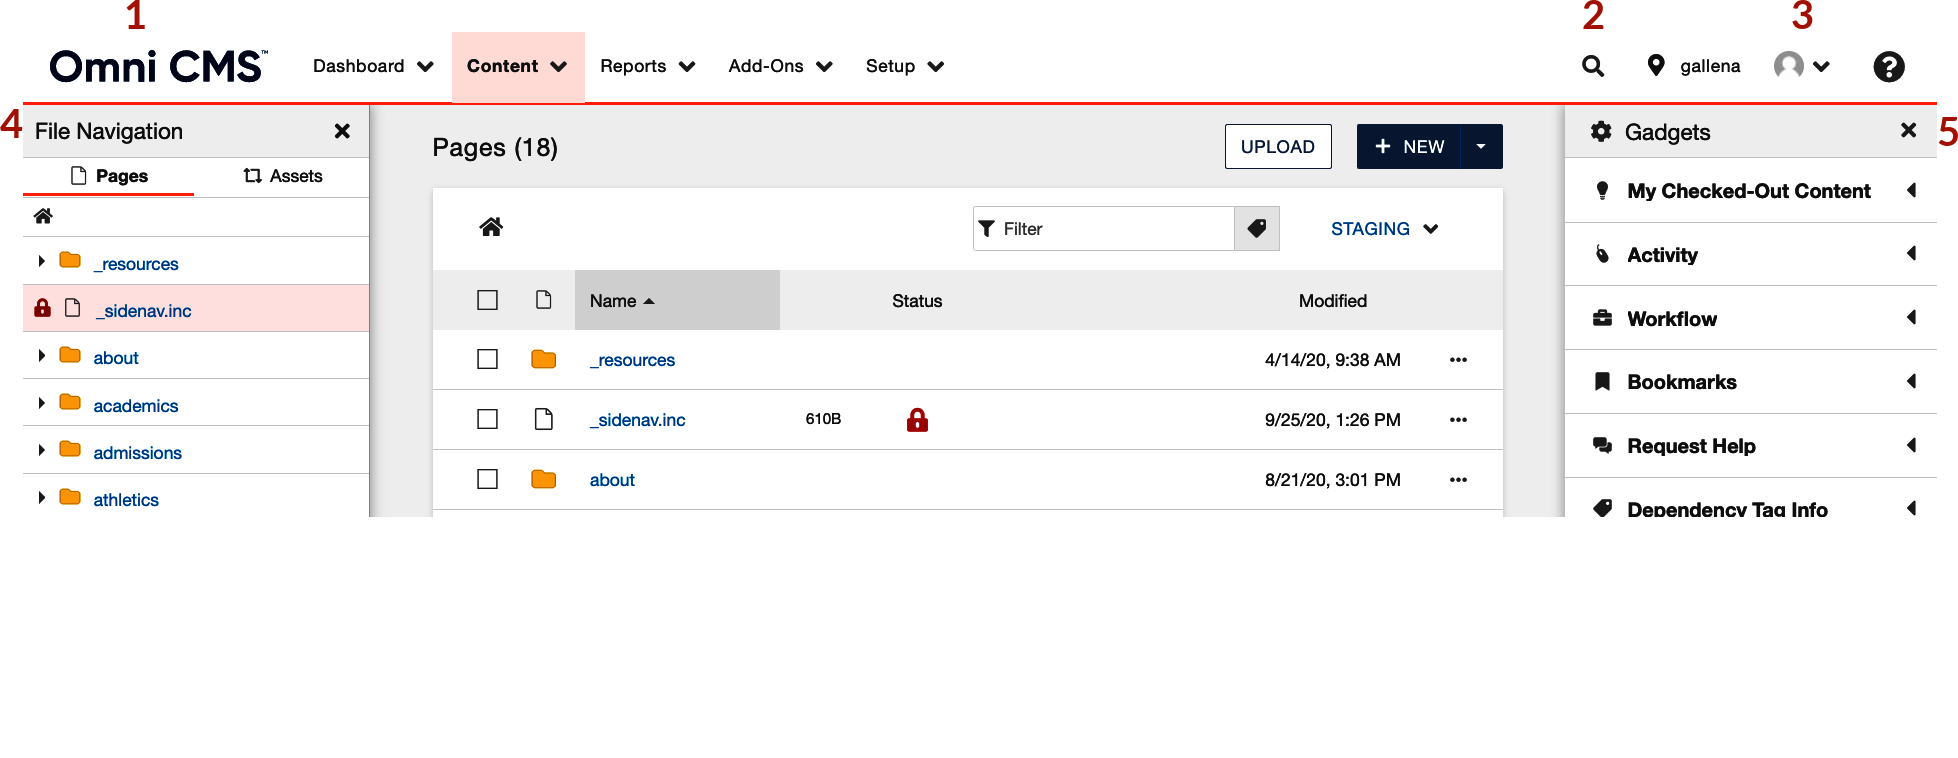
- Main menu: Access most of your Modern Campus CMS content and functions from this menu. This includes your dashboard, the content menu (including pages, assets, and more), reports, and add-ons.
- Global search: Search your Modern Campus CMS account for content, users and more.
- User avatar and settings: Your user avatar is set via Gravatar, a third-party website that uses your avatar on any Gravatar-enabled site. Make sure you use the same email address for Gravatar that you use for your Modern Campus CMS account.
- Help menu: Search the Modern Campus CMS Support site and go to your custom help URL (if applicable). Go to the Modern Campus CMS Community Network, the Modern Campus Feedback Forum, and Modern Campus CMS release notes.
- File navigation sidebar: Expand to see and interact with the file structure of your website.
- Gadgets sidebar: Expand to see available gadgets.
For a detailed explanation of the Modern Campus CMS User Interface, check out this video from Modern Campus.
Creating New Pages and Sections
Pages
This video from Modern Campus shows how to create a new page. Below it are detailed instructions.
Logging in and Introduction to the Interface from Modern Campus CMS Training on Vimeo.
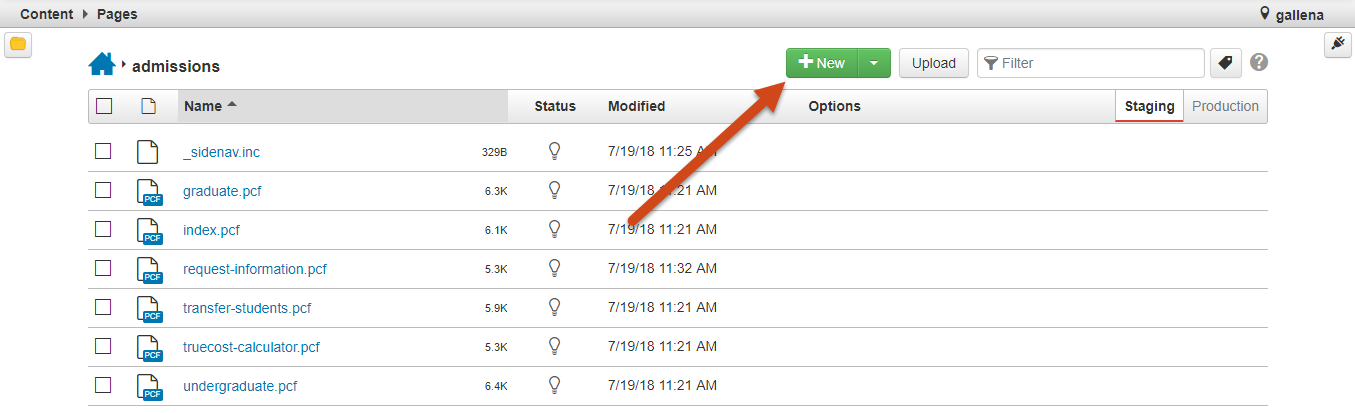
- Navigate to the Pages list showing the location where you'd like to add a new page.
- Above the page listing, click on the +New button.
- Choose the appropriate page template.
- Fill in the prompted form fields as appropriate.
- Click Create in the bottom right of the box.
Sections
This video from Modern Campus shows how to create a new section. Below it are detailed instructions.
- Navigate to the Pages list showing the location where you'd like to add a new section.
- Above the page listing, click on the +New button.
- Choose the appropriate section template.
- Fill in the prompted form fields as appropriate.
- Click Create in the bottom right of the box.
Editing in Modern Campus CMS
To edit a page, log in through the DirectLink or go to Content > Pages and click on the section you are working in and then the file name of the page.
View this video from Modern Campus that explains how to edit using the WYSIWIG editor.
For further details, visit our Editing in Modern Campus CMS page, or visit Modern Campus's Learn Modern Campus CMS website.
Submitting a Page to Publish
Once your edits are complete, you need to publish your page for those changes to be applied to your live web pages. Unless you are a level 10 user, you will need to submit pages to an approver as part of a workflow.
To submit a page for approval, follow these steps:
- Navigate to the appropriate page in Modern Campus CMS that you want to submit for approval.
- From the Page Actions Toolbar, click on the Check In/Check Out lightbulb icon to turn it on and check out the page.
- From the Page Actions Toolbar, click the green Submit button.
- From the Submit for Approval box, select the appropriate user from the "To" dropdown as needed. If you have an assigned approver, they should be the first name to populate.
- Add a "Subject".
- Add a "Message" as needed. This is where you would let your approver know what changes you have made. Be as descriptive as possible. This is what will be included in the Versions Log.
- Select "Send Copy to Email" as appropriate. Typically you will always opt for an email copy.
- Click Submit in the bottom right of the box.
